I-InsureCRM
Welcome to I-InsureCRM
I-InsureCRM is a professional lead management system built for insurance agents. It helps you capture leads, manage policies, track commissions, run marketing campaigns, and stay organized — all in one place. This manual covers every feature in the app so you can get the most out of it.
Your First Login
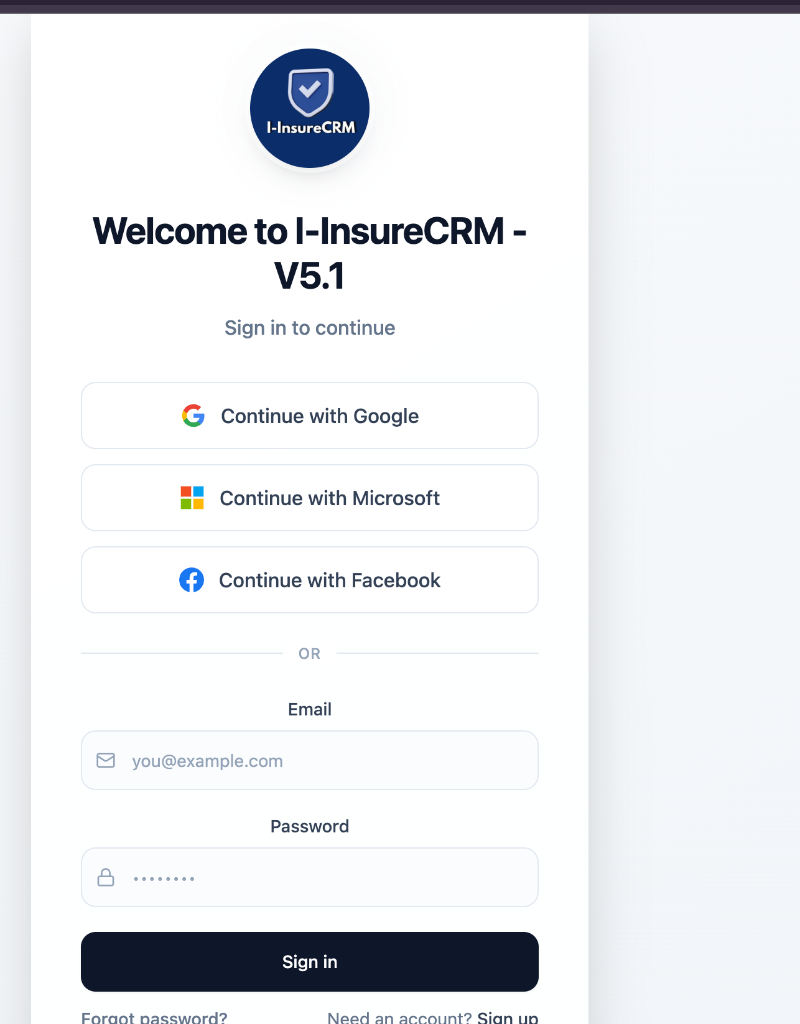
When you first sign up, you get a 14-day free trial of the Starter Agent plan. On your first login you will be asked to accept the Terms of Service. After that, take a moment to complete your Agent Profile (Settings → Agent Profile) — your name, title, company, NPN number, and licensed states are used across the app for email signatures, landing pages, and analytics.
Subscription Tiers
Three plans are available: Starter Agent ($9.99/mo — 500MB storage, 25 active leads), Growth Pro ($24.99/mo — Google integrations, 2GB storage, 100 active leads), and Elite ($39.99/mo — Marketing tools, 15GB storage, unlimited leads). Upgrades are instant; downgrades take effect at the end of your billing period. Manage your plan under Settings → Billing.
Starter Agent is the base paid plan. Google Integrations require Growth Pro or Elite. Marketing tools require Elite. See each section below for specific paid feature notes.
Top Stats
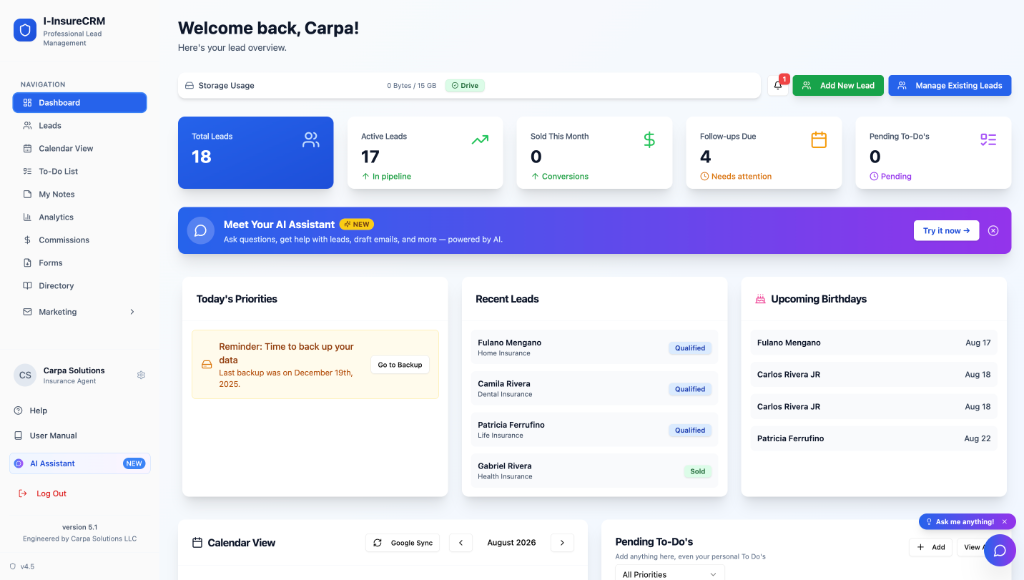
The dashboard shows four key cards: Total Leads (all leads), Active Leads (in your sales pipeline), Sold This Month (marked Sold in the current month), and Follow-ups Due (follow-up date is today or in the past).
Customizing Your Layout
Click "Customize Layout" to drag and drop widgets within columns. Click "Finish Editing" to save your arrangement.
Notification Bell
The bell icon (🔔) in the dashboard header aggregates notifications: new leads (last 24h), follow-ups due today, upcoming birthdays (within 7 days), completed exports ready to download, and pending To-Do tasks that are due today or overdue. Click any item to jump to the relevant page.
Calendar View
The integrated calendar shows all follow-ups, birthdays, to-dos, and license expirations, color-coded by type. Click any date to see the tasks for that day.
Resizing the Sidebar
You can drag the right edge of the sidebar to resize it. Your preferred width is saved automatically.
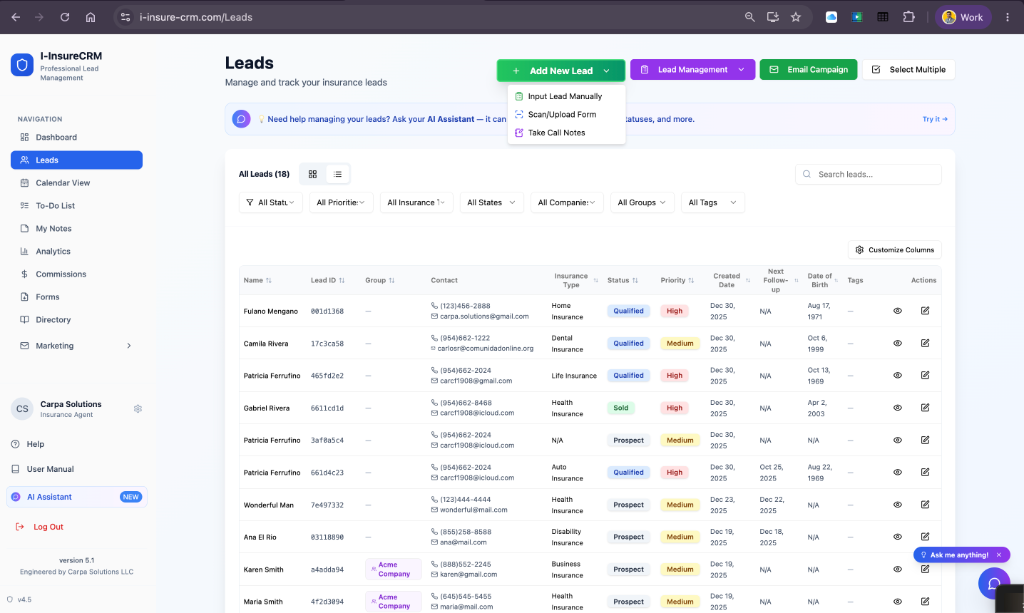
Adding a New Lead
Click "Add New Lead" on the Leads page and fill in the required fields (first name, last name, phone, email, preferred language). First select the insurance interest (Health, Life, or Other), then the specific insurance type. Click "Save Lead" when done.
Auto-Save of Incomplete Leads
As you fill out the Lead Form, once you complete the required fields in any section (Personal, Identification, Family, Employment, or Insurance), the lead is automatically saved in the background as "Incomplete" — you do not have to click Save first. This protects your progress if you navigate away or your session is interrupted.
Unsaved Changes Protection
If you click a sidebar link while the Lead Form has unsaved changes, a confirmation dialog appears so you do not lose your work accidentally.
Scan Document (📷)
The Scan button at the top of the Leads page lets you photograph or upload any insurance document (ID card, insurance card, license, application form) and the AI automatically extracts lead information. Review the extracted fields with confidence indicators (green = high, yellow = medium, red = low), edit as needed, and click "Save Lead".
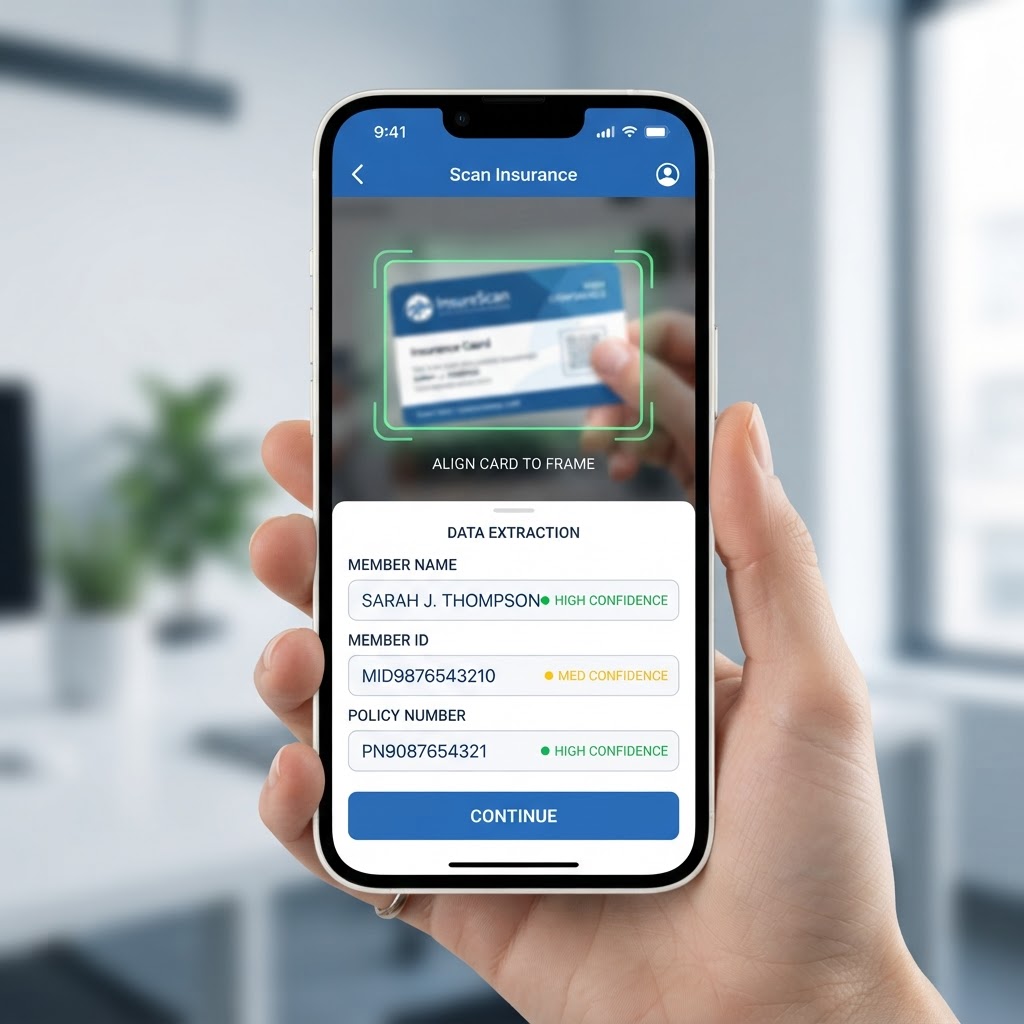
Illustration — actual interface may vary
Take Notes / Call Notes
Capture free-form notes during or after a phone call, and the AI extracts structured lead information from your notes to suggest a new lead. A standalone Note record is saved so your original notes are preserved even if the lead status changes. View all notes on the My Notes page.
Policies by Person
Access from Leads → Lead Management dropdown → View Policies by Person. This aggregates all policies for a client into one unified dashboard view. This is for working with multi-policy clients — it is different from Find Duplicates, which is for cleaning up accidental entries.
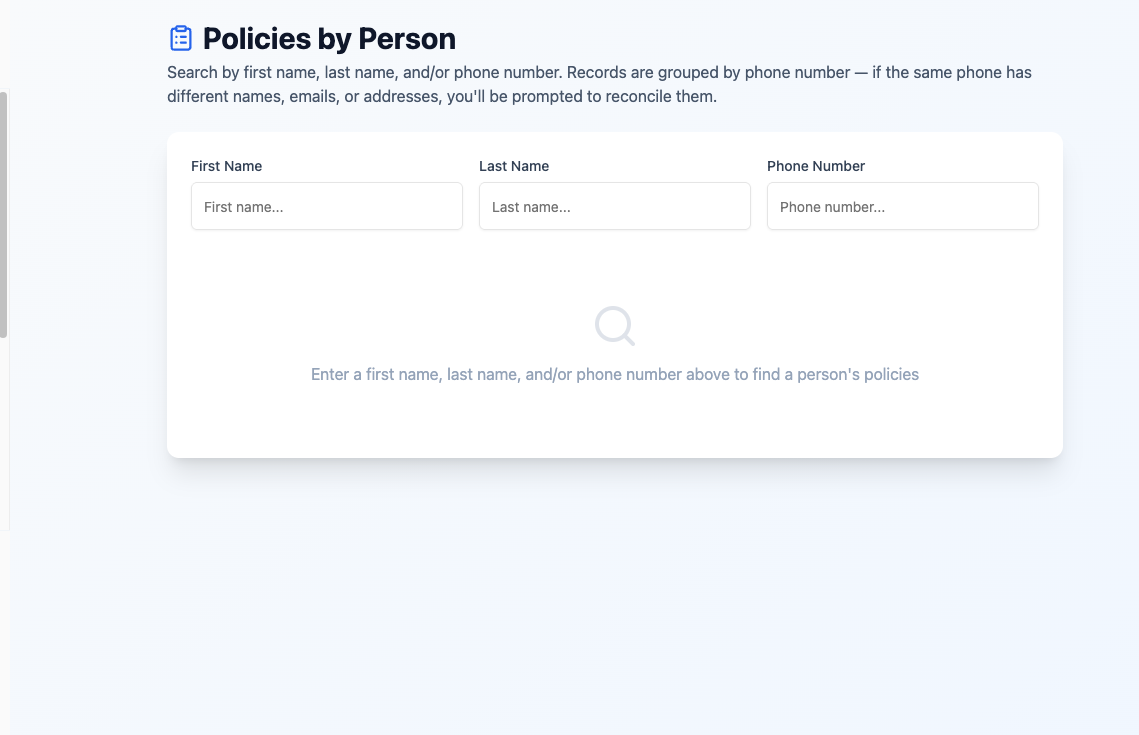
How to Use Policies by Person Search
On the Policies by Person page, enter the person's First Name, Last Name, and/or Phone Number into the respective search fields, then click Search. Records are grouped by phone number — if the same phone number has different names, emails, or addresses associated with it, a Discrepancy Banner appears prompting you to reconcile the conflicting entries. Review the grouped policies, resolve any discrepancies, and use the export options to download the person's policy profile as a PDF or CSV.
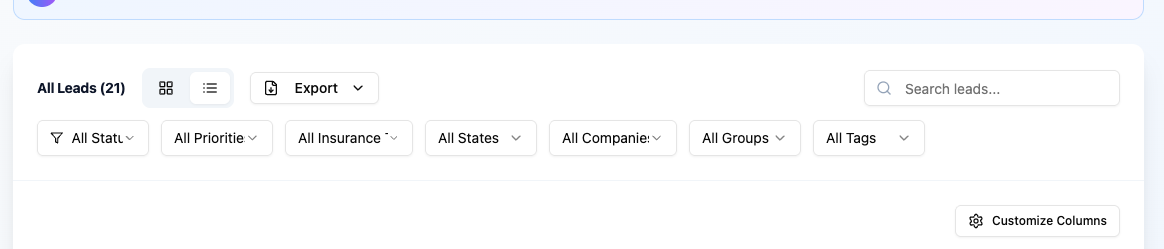
Leads Toolbar — Search, Filter & Customize
The top of the Leads page has a toolbar with the total lead count, a Grid/List view toggle, an Export button (download filtered leads as CSV or PDF), and a "Search leads..." bar. Below it, a filter row lets you narrow leads by Status, Priority, Insurance type, State, Company, Group, and Tag — each dropdown has a funnel icon. Click "Customize Columns" (gear icon) to choose which columns appear in the list view. Filters and search work together, so you can combine them to find exactly the leads you need.
All Groups View
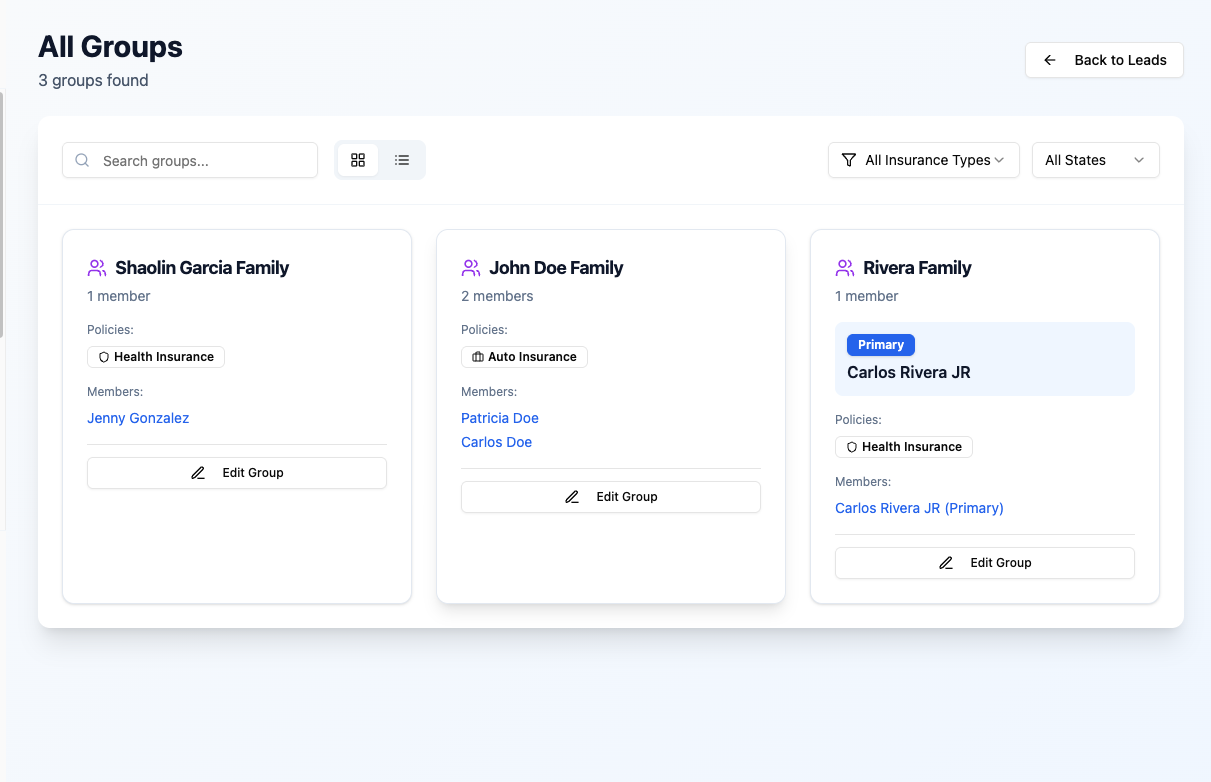
Click "All Groups" on the Leads page to see every family or business group you have created. Each group card shows the group name, member count, insurance type badge, and the names of its members — the primary policy holder is highlighted with a blue "Primary" badge. Use the search bar and the "All Insurance Types" / "All States" filters to narrow the list. Click "Edit Group" on any card to manage its members and policy settings. Click "Back to Leads" to return.
Find Duplicates
Scans for leads with similar names, emails, or phone numbers but excludes leads that match on all 4 identity fields (those are handled by the Policies by Person view). Only partial matches are flagged as duplicates. Use "Merge to Lead to the Left" or "Merge Leads" to combine records. An "Undo Last Merge" button appears after merging.
Family Groups & Policy Sync
Organize related leads into groups (families, business entities). When the primary policy holder of a group is marked "Sold", all other members with the same insurance type are automatically set to "Sold". When you enter a policy number on any member, it syncs to all members of the same group with the same insurance type.
Deleting a Lead
Click Delete on a lead card or in lead details. You must select a reason. The lead is archived (not permanently removed) and can be restored from "View Deleted Leads".
Activating Bulk Mode
Check the checkbox on any lead card or row. As soon as at least one lead is selected, the Bulk Actions bar appears at the top. Click "Select All" to select all leads currently visible (based on your active filters).
Available Operations
🔄 Update Status — change the status of all selected leads at once. 🏷️ Add Tag — apply a tag to all selected leads (added alongside existing tags). 📅 Set Follow-Up Date — create a To-Do task for each lead and update their next follow-up date. 📧 Send Email Campaign — open the campaign composer pre-loaded with selected leads (requires Gmail connected). ⬇️ Export to CSV — instantly download a CSV of selected leads. 🗑️ Delete Selected — archive all selected leads after confirmation.
📧 Send Email Campaign is a PAID feature — requires Elite subscription and Gmail connected (Growth Pro or Elite). All other bulk actions are available on all plans.
Creating Tasks
The To-Do list is flexible for work tasks, personal reminders, or anything. Set a title, due date, priority (low, medium, high), and optionally link a Related Lead by typing the lead's name to search.
Auto-Created Tasks
The system automatically creates To-Do tasks for: birthdays (when a lead's birthday is today or tomorrow), missing primary policy holders in a group, and new leads from your public Lead Capture Form. All auto-created tasks appear in your To-Do List like any manual task.
Google Calendar Sync
If Google Calendar integration is enabled, tasks automatically sync as calendar events.
Completed Task Retention
Set how long completed tasks are kept (5, 15, 30, or 45 days) from the dropdown at the top of the To-Do List page. Completed tasks older than your retention period are automatically cleaned up. Pending tasks are never auto-deleted.
Daily To-Do Email
An automatic morning digest summarizing your pending tasks for today and the next 5 days is sent every day at 6:00 AM. If you have no pending tasks in that window, no email is sent.
AI-Suggested Todos from Notes
On the My Notes page, view a note and click "Create Todo (AI Suggestion)" — the AI generates a task based on the note content, matching the note's language. You can set a due date or let it default to 3 days from now.
Paid Feature — Elite Subscription Required
All Marketing tools (Email Templates, Email Campaigns, Lead Capture Form, Agent Landing Page) require an Elite subscription. Starter Agent and Growth Pro users will see an upgrade prompt when accessing the Marketing section.
PAID FEATURE: Elite subscription required ($39.99/mo). Upgrade under Settings → Billing.
Email Templates
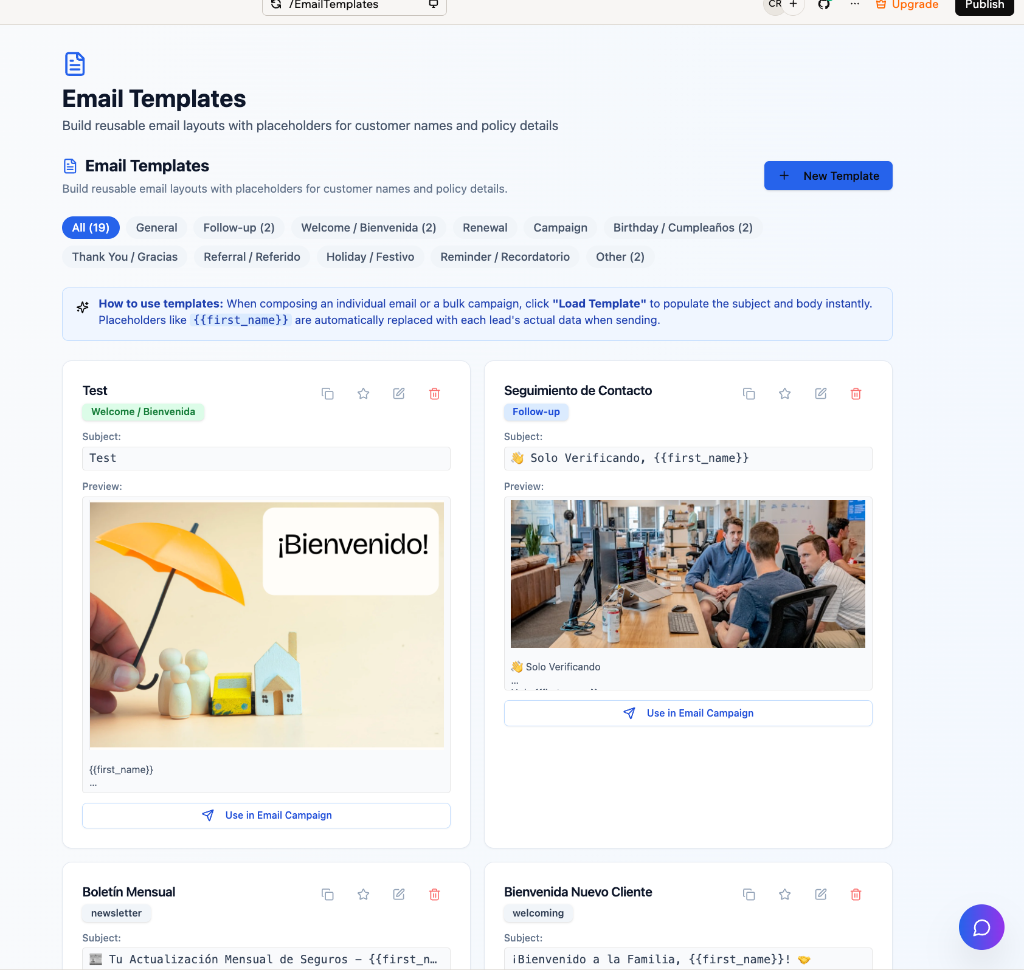
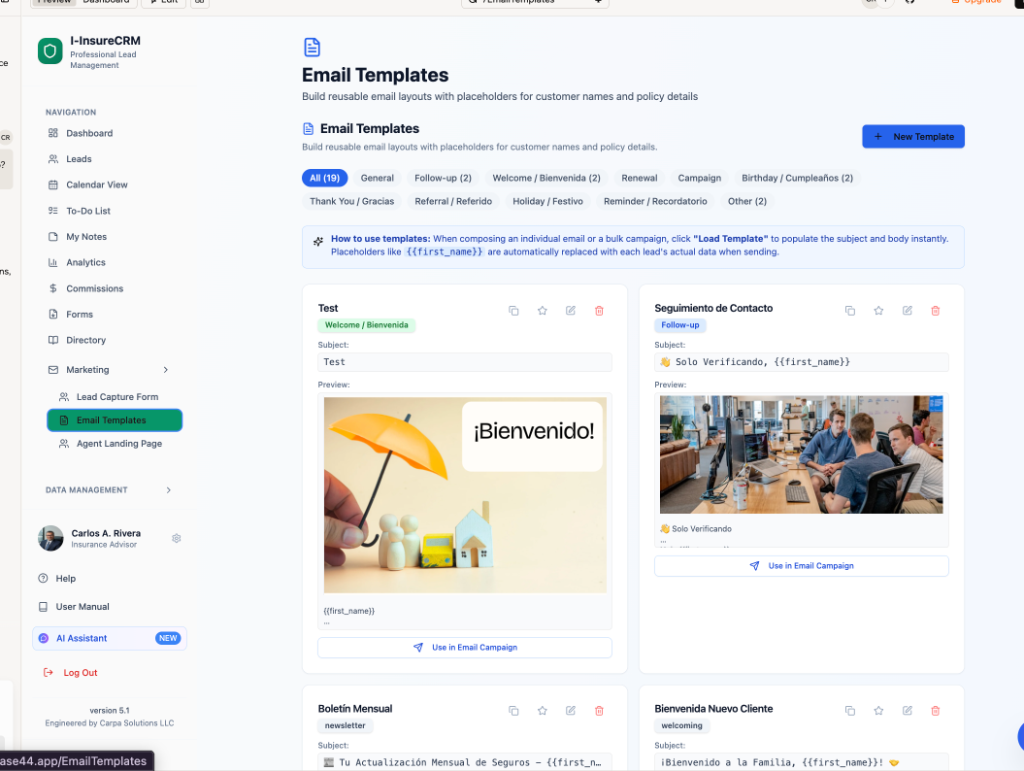
Go to Marketing → Email Templates to create reusable email layouts with placeholders like {{first_name}} and {{insurance_type}}. Use the rich-text editor for bold, italic, colors, images, links, and lists. Templates are organized by category (General, Follow-up, Welcome, Renewal, Campaign, Birthday, Thank You, Referral, Holiday, Reminder, Other). You can only edit or delete templates you created; pre-built app templates are read-only but usable.
Using a Template
When composing an individual email (Gmail) or a bulk campaign, click "Load Template" to populate the subject and body. Placeholders automatically fill with each lead's real data.
Use in Email Campaign Button
Each template card has a "Use in Email Campaign" button. Click it to open an audience-selection dialog with the same filters as the Leads page (search, status, priority, insurance type, state, company, group, tag), defaulting to all your leads. The dialog shows how many leads have an email and will receive the campaign. After picking your audience, click "Continue to Compose" to open the Campaign Composer with that template preloaded. Requires Gmail connected (Growth Pro or Elite).
Bulk Email Campaigns
Select leads on the Leads page → Bulk Actions → Send Email Campaign, or start from a template using "Use in Email Campaign". The Campaign Composer lets you switch language (English/Spanish), edit the message, attach files, and send. Each recipient's placeholders are filled with their real data.
Lead Capture Form
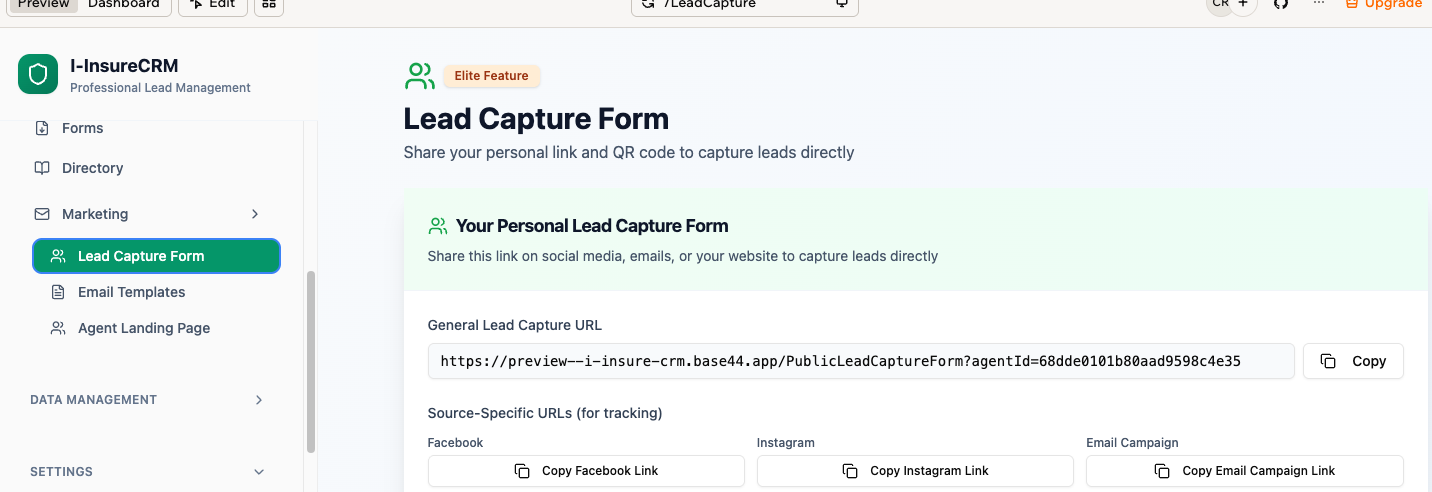
A public-facing form with your unique URL. When someone submits it, a new lead is automatically created and assigned to you. You get source-specific URLs (General, Facebook, Instagram, Email Campaign) to track where each lead came from. Download your QR code from the Lead Capture tab.
How to Use the Lead Capture Form
Go to Marketing → Lead Capture Form. The page shows your General Lead Capture URL at the top — click "Copy" to copy it to your clipboard and share it on social media, in emails, or on your website. Below, the Source-Specific URLs section provides separate tracked links for Facebook, Instagram, and Email Campaign so you can identify which channel each lead came from. Click "Copy Facebook Link", "Copy Instagram Link", or "Copy Email Campaign Link" to copy the corresponding tracked URL. Use these links in your marketing posts to measure which channel performs best.
Agent Landing Page
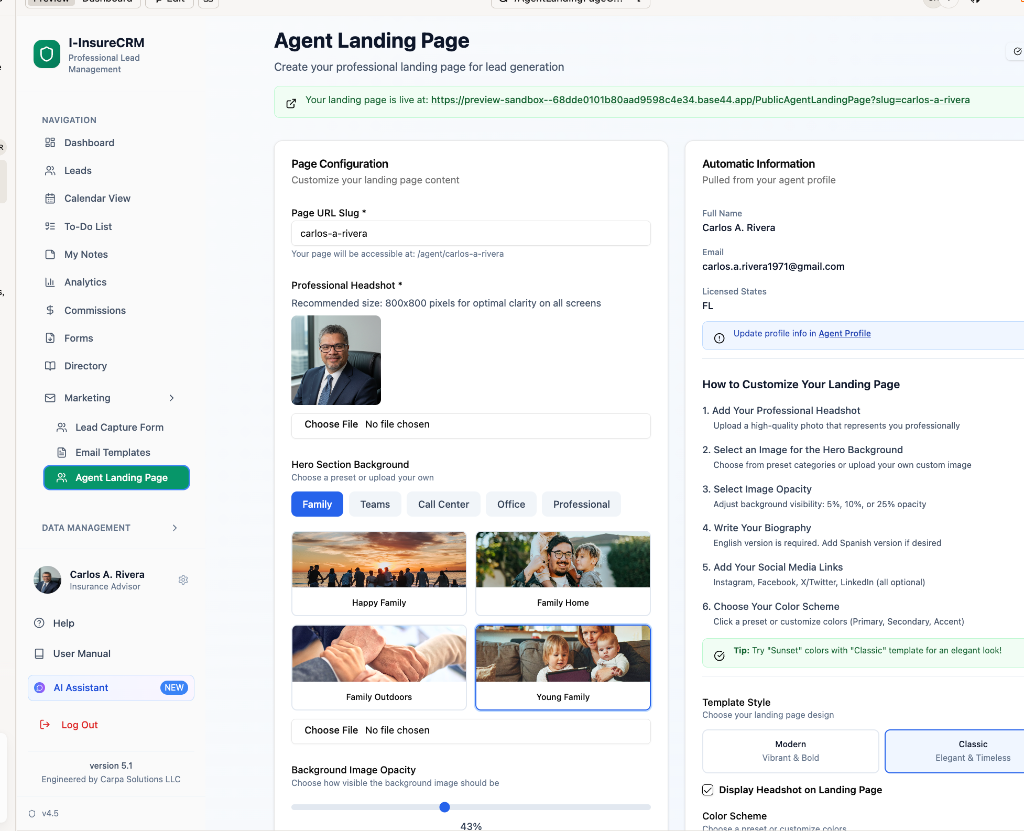
A professional public webpage showcasing your profile, services, and a "Request Quote" button. Customize your headshot, hero image, biography, tagline, testimonials, services, FAQ, social links, and color scheme. Choose a template style (Professional, Modern, Classic). Toggle between Draft and Published. Once published, share your unique URL on social media, email signatures, and business cards.
Available Forms
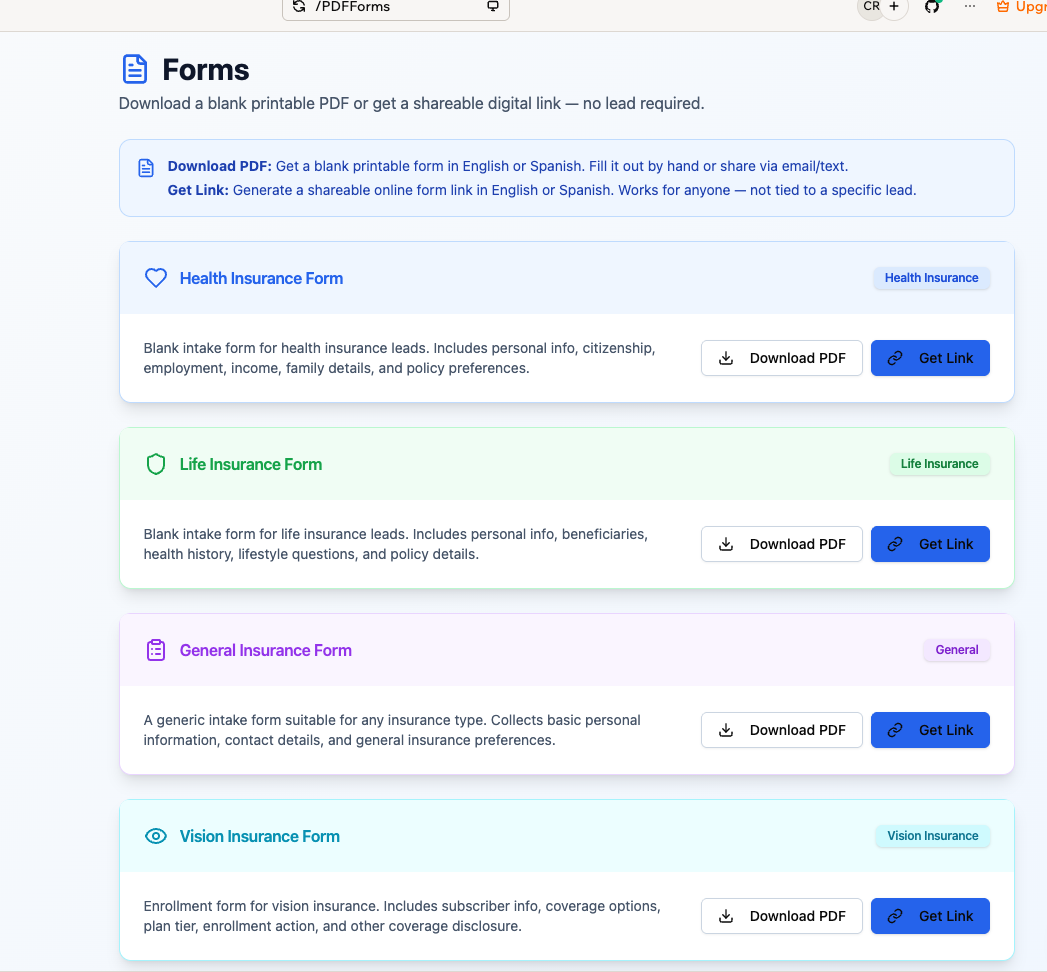
The Forms page (sidebar → Forms) lists four blank intake forms: Health Insurance (personal info, citizenship, employment, income, family, policy preferences), Life Insurance (personal info, beneficiaries, health history, lifestyle, policy details), General Insurance (basic personal info, contact, general insurance preferences), and Vision Insurance (subscriber info, coverage options, plan tier, enrollment action, other coverage disclosure). Each card has two actions: "Download PDF" and "Get Link".
Download PDF
Click "Download PDF" on any form card, choose English or Spanish, and click "Download". A print-ready PDF is generated instantly with form fields, checkboxes, and signature sections. Print it and fill it out by hand, or share the file via email or text — no lead is required.
Get Link
Click "Get Link" on any form card, your name is pre-filled (editable), choose a language, and click "Generate Link". Copy the URL and share via text, email, or WhatsApp. The online form works for anyone — it is not tied to a specific lead. When the recipient submits, you receive an email with their data and a high-priority To-Do notification. Standalone submissions do not auto-create a lead — you review and create it manually.
Standalone vs. Quick Action
Standalone links (from the Forms page) are not tied to any lead. Quick Action links (from a lead's "Send Form" button) are tied to a specific lead and can auto-update that lead's record on submission.
Recording Commissions
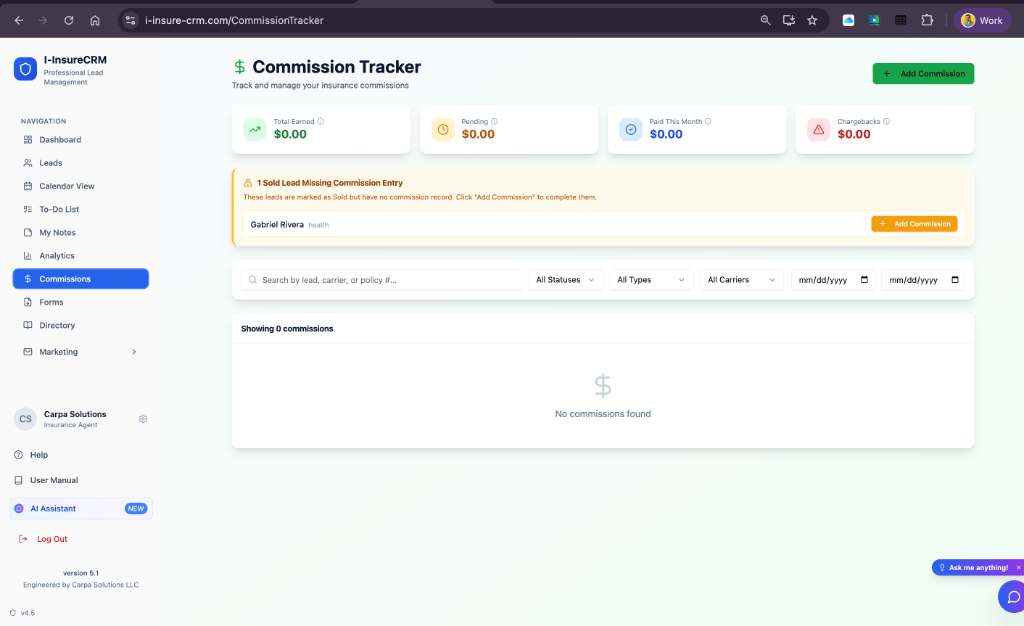
Commissions are created two ways: (1) Auto-prompt — when you change a lead's status to "Sold", a Commission Modal appears to log details (you can Save or Skip for Now). (2) Manual entry — from the Commission Tracker page, click "Add Commission".
Auto-Calculation
Commission Amount = Annual Premium × Commission Rate ÷ 100. If you manually edit the amount, a "Manual Override" badge appears.
Commission Types
First Year (initial), Renewal (ongoing on renewed policies), Advance (upfront payment of future commissions), As Earned (paid as premiums are collected).
Payment Statuses
Pending (recorded, not approved), Approved (approved for payment), Paid (paid out — records the actual pay date), Chargeback (reversed — add a reason). Click "Mark as Paid" on any pending or approved commission.
Missing Commissions Report
The Commission Tracker shows all sold leads that do not yet have a commission record, including dependents (who are automatically marked Sold when the primary is sold).
Who Sees What
Non-admin agents can only see their own statistics. Supervisors (admin users in a company or broker environment) can view data for all agents.
KPI Cards
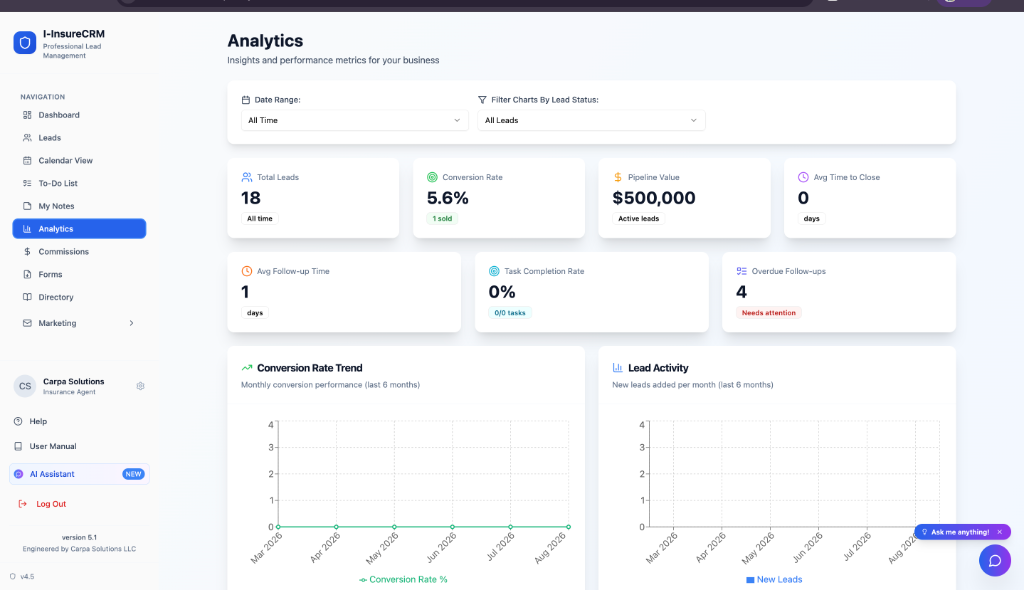
Total Leads, Conversion Rate, Pipeline Value, Average Time to Close, Average Follow-up Time, Task Completion Rate, and Overdue Follow-ups.
Charts
Conversion Rate Trend, Lead Activity, Sales Pipeline Value Trend, Lead Source Effectiveness, Top Insurance Companies, Policy Types distribution, Top States, and Lead Status breakdown. Filter by date range, agent (supervisor only), and status.
Requirements
Google Integration requires Growth Pro or Elite subscription. Connect your account under Settings → Google Integration.
PAID FEATURE: Growth Pro ($24.99/mo) or Elite ($39.99/mo) subscription required. Starter Agent users must upgrade to use Google integrations.
Gmail
Send individual emails or bulk campaigns directly from the app. Without Gmail connected, you can still click "Send Email" in lead details to open your default email client.
Calendar
Auto-syncs follow-ups, birthdays, to-dos, and license expirations as calendar events.
Drive
Creates a folder structure (Agent Data → Leads, Licenses, Exports) and migrates existing files. Each lead gets a dedicated Drive folder for attachments. For unlimited storage, connect Google Drive.
Creating Tags
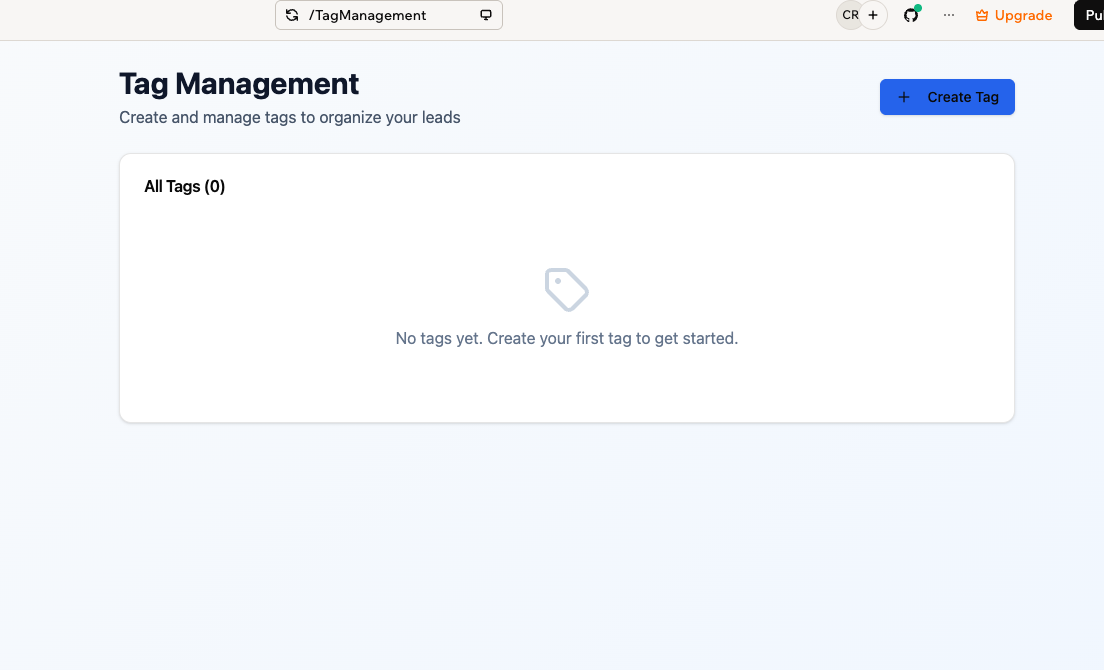
Go to Data Management → Tag Management. Click "Create Tag", enter a name, choose a color (blue, green, yellow, red, purple, pink, orange, gray), and save. When you have no tags yet, the page shows an empty state with a "No tags yet" message — click "Create Tag" to make your first one.
Applying Tags
When creating or editing a lead, scroll to the Tags section in the Administrative Details card. Tags are private — each agent manages their own.
Filtering by Tag
On the Leads page, use the tag filter to show only leads with specific tags. Deleting a tag automatically removes it from all leads that had it.
Export Leads
Go to Support → Export Leads, apply filters, and start the export. It runs in the background. Check Export History to download completed files (links expire after 7 days).
Import from CSV
Go to Support → Import Leads, upload a CSV file, and map columns to lead fields. Required: First Name, Last Name, Phone, Email.
How to Import Leads
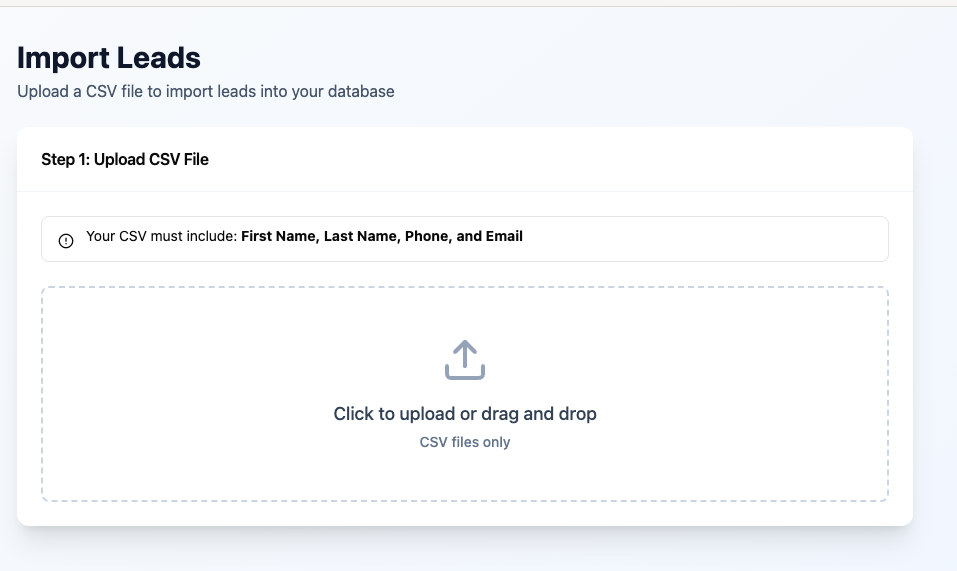
On the Import Leads page, Step 1 shows a dropzone area — either drag and drop your CSV file onto it or click to browse and select one (CSV files only). A reminder banner notes that your CSV must include the four required columns: First Name, Last Name, Phone, and Email. After uploading, you map your CSV columns to the corresponding lead fields and confirm the import. Review the mapping carefully before importing to avoid mismatched data.
View Deleted Leads
Deleted leads are archived and can be restored from Support → View Deleted Leads.
How to Restore or Permanently Delete
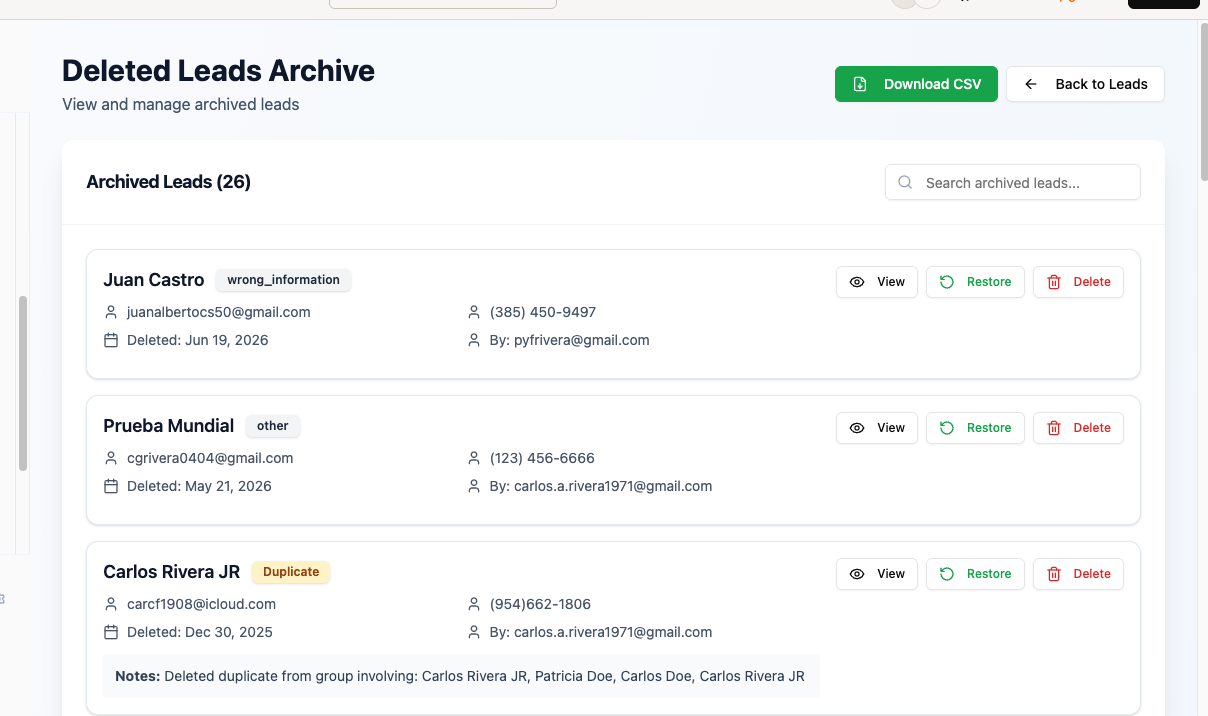
The Deleted Leads Archive page lists all archived leads with a count, a search bar, and a "Download CSV" button to export the archive. Each entry shows the lead name, deletion reason tag (e.g., Duplicate, wrong_information, other), email, phone, deletion date, and who deleted it. Use the "Search archived leads..." box to find a specific record. Each row has three actions: View (see full details), Restore (return the lead to your active list), and Delete (permanently remove it). Merged-duplicate entries include a Notes field describing which records were involved in the merge.
Changing Your Password
Go to Settings → Security. Enter your current password and the new password twice for confirmation.
Email Address
Your email cannot be changed as it is your unique account identifier. Contact support if you need it changed.
Terms of Service
All users must accept the current Terms of Service to use the app. When the ToS is updated, you will be prompted to accept the new version.
Storage Allocation
Starter Agent: 500MB, Growth Pro: 2GB, Elite: 15GB local storage. For unlimited storage, connect Google Drive (requires Growth Pro or Elite).
Google Drive for unlimited storage requires Growth Pro or Elite subscription (paid feature). Local storage limits vary by plan.
Lead Attachments
Each lead has an Attachments section in its detail page. Upload photos, PDFs, or any document. If Google Drive is connected, files sync to the lead's dedicated Drive folder automatically.
AI Assistant Chatbot
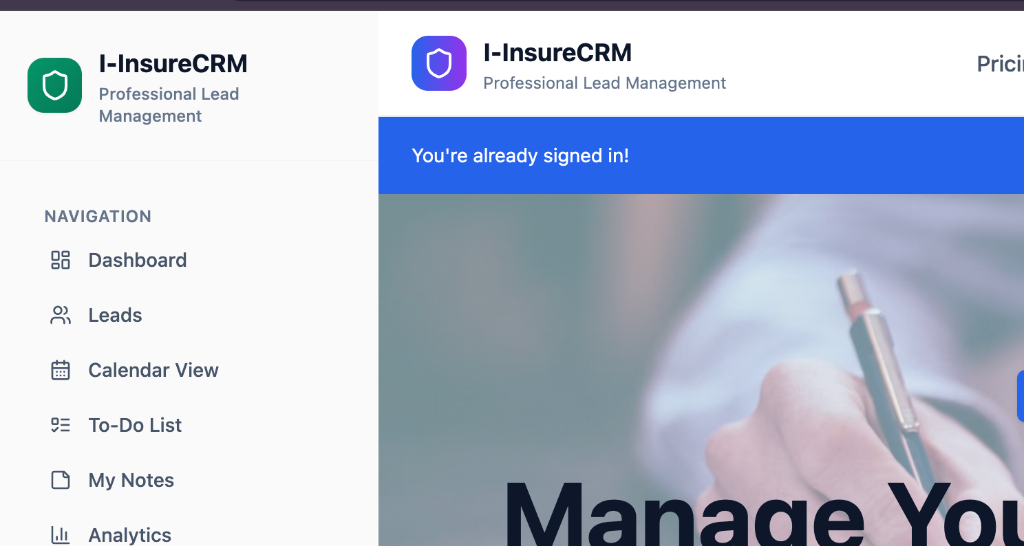
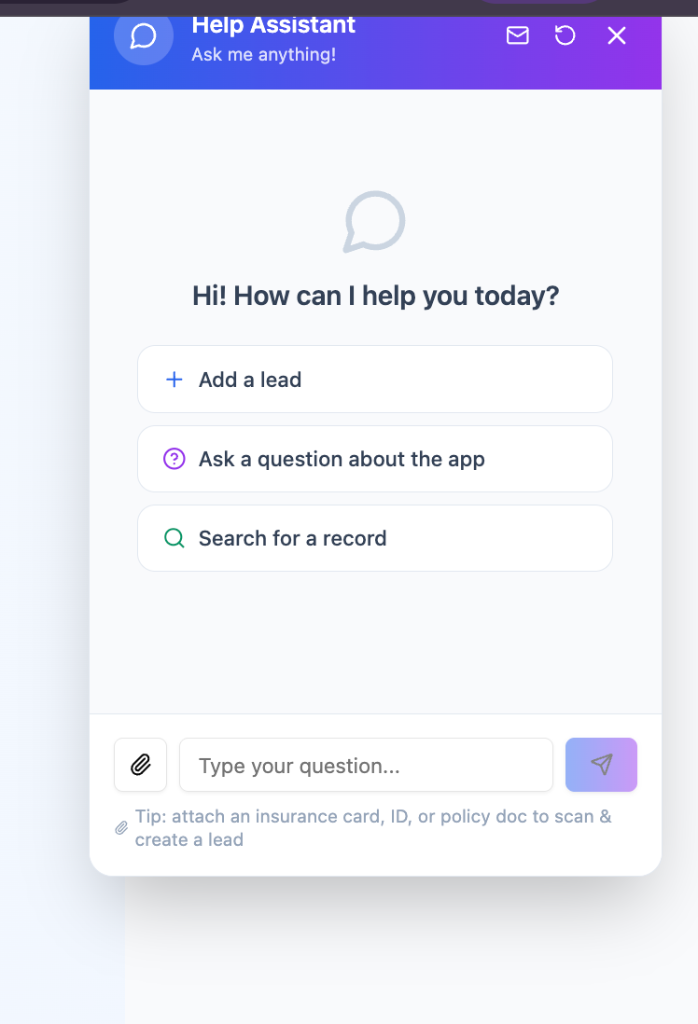
Click the floating button (bottom-right) or "AI Assistant" in the sidebar to open the chatbot. It can answer questions, search your leads, add new leads (manual, scan, or from call notes), and guide you through any feature. It responds in your preferred language (English or Spanish).
Adding a Lead from Chat
Tell the assistant "I want to add a new lead". You can scan/upload a document (tap the + paperclip button), enter info manually, or paste call notes for the AI to extract. The assistant reviews the data with you and creates the lead.
Searching Records from Chat
Tell the assistant "I want to search for a record" and provide a name, email, phone, status, or insurance type. Results include a link to open the filtered Leads page directly.
Drag-and-Drop File Upload in Chat
You can drag a file directly onto the chat window to trigger the scan-and-extract flow, just like the Scan button on the Leads page.
Contacting Support
For anything the assistant cannot resolve, use the Contact Support option on the Help page.
I-InsureCRM v5.1
© 2026 I-InsureCRM. All rights reserved.
Engineered by Carpa Solutions LLC
Last updated: August 18, 2026
Need more help? Visit the Help Center or use the AI Assistant.